Chapter 4.2 ABAB
A-B-A-B Design
The A-B-A-B design represents an attempt to measure a baseline (the first A), a treatment measurement (the first B), the withdrawal of treatment (the second A), and the re-introduction of treatment (the second B). In other words, the A-B-A-B design involves two parts: (1) gathering of baseline information, the application of a treatment and measurement of the effects this treatment; and (2) measurement of a return to baseline or what happens when the treatment is removed and then again applying the treatment and measuring the change.
In terms of an actual study, imagine you are attempting to train your dog to sit on command. As a simple example how this design might work, imagine you just adopted two untrained puppies. You’re first goal as a new dog owner is to teach both puppies to sit on command. You want to measure the effects of using a treat or biscuit versus using verbal and physical praise, so you apply the treat to Puppy 1 and the praise to Puppy 2.
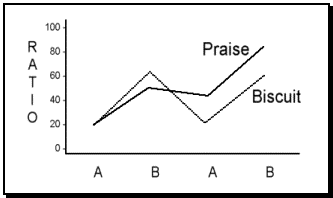
The initial A in this design refers to a baseline for each subject. To determine this, you might say the command ‘sit’ to each puppy at ten different times and measure how many times each puppy actually sat. If puppy 1 sat twice, the ratio would be 2:10 or 20%. If puppy 2 sat twice, the ratio would be 2:10 or 20% as well. The next step would be to apply the treatment or training to each puppy. Each puppy would be commanded to sit twice every ten-minutes for a two-hour period. Puppy 1 would receive a biscuit if he responded appropriately and puppy 2 would receive praise. Neither would receive any reinforcement or punishment for noncompliance. At the end of the two-hour period, the change due to treatment is measured (the first B). If puppy 1 sat 16 times, the ratio would be 16:24 or 67% and if puppy 2 sat 12 times, the ratio would be 12:24 or 50%.
The training would then cease for a period of time, say 24 hours, and the puppies would then be commanded to sit similar to how we determined the original baseline. This second baseline (the second A) measures the effects of extinction, or the withdrawal of the positive reinforcer, on behavior. Without continual reinforcement, we are determining if the second baseline returns to the original or if the behavioral change we experienced will continue. For the sake of this example, assume the second baseline for puppies 1 and 2 is 20% and 45% respectively.
Finally, the treatment is once again applied (the second B) to measure the effects of spontaneous recovery. We’ll assume the re-application of the treatment or training resulted in a ratio of 67% for puppy 1 and 80% for puppy 2.
So what does this all mean? If you look back at the original A-B, you’ll notice that the training with a biscuit increased the ratio of response from 20% to 67% and the training with praise increased the behavior from 20% to 50%. From this initial data, it appears as if the use of a biscuit produced a greater change in behavior. However, looking at the withdrawal of the reinforcer produced a return to the baseline for puppy 1 while puppy 2 held onto some behavioral change. This would suggest that the use of a biscuit for training produces a greater change but results in a greater loss when it is no longer used. The puppy that received the praise was more likely to hold onto gains in his behavioral change. See Figure 4.
The final training also suggests that the puppy that received the biscuit returned to where he was after treatment once the reinforcer was applied again but that puppy 2 jumped way up to 80%. The final outcome for our single subject design using two subjects would suggest that the use of praise results in an overall increase in behavioral change when compared with the biscuit. In the final analysis, the praise would be considered a superior reinforcer or training method than the biscuit.
Figure 4.1: Determination of Best Training Method
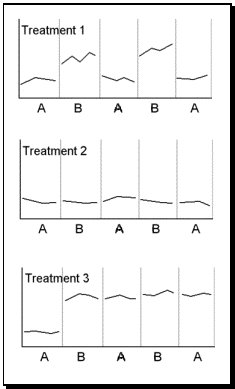
Finally, different treatments can be applied to different subjects in order to compare results. Figure 4.2 shows the application of the ABABA design on three subjects each being applied a different treatment. From the chart it is obvious that treatment 1 increases the desired behavior but that this behavior returns quickly to baseline when the treatment is discontinued. Treatment 2 shows no change in behavior in any of the trials. Treatment 3, however, shows an increase in the desired behavior when the treatment is applied and that this increase remains consistent even when the treatment is discontinued. If the goal is a longstanding increase in behavior, treatment 3, from the information available and of the choices offered, is obviously the best approach.
The A-B-A-B design can obviously be altered to include any number of baselines and treatment phases. To determine the effects of treatment and the degree of extinction only, a simpler A-B-A design would be used To determine if additional training changes the ultimate results, a more complex A-B-A-B-A-B-A-B could be employed. Each study could be completed with only one subject or the results of different subjects with different treatment approaches could be compared (See Figure 4.2). The complexity of the study depends on both the original intention and feasibility.
Figure 4.2: Application Three Different Treatments on Three Single Subjects
When a more complex schedule is applied, the extinction phase for one treatment can become the baseline phase for an additional treatment. Simply put, this method allows overlapping treatments to be tested with only a single subject. Figure 4.3 demonstrates the hypothetical outcome of using a single subject to determine the effects of three different treatment methods. For the first treatment, the initial A is considered the baseline for Treatment A and B1 represents the application of the first treatment. A2 represents the removal of Treatment A and also acts as the baseline for the second treatment. The second treatment is applied at B2 followed by another extinction phase (A3), which then becomes the baseline for the third treatment applied at B3. The final A represents the extinction phase of the final treatment method.
Looking at the results in Figure 4.3, you will notice that Treatment A appears to have had the most effect, however, once Treatment A was discontinued, the behavior returned nearly to baseline. Treatment B had a moderate effect but during the extinction phase, the behavior remained at a moderate level suggesting a low or non-existent extinction of the treatment. Finally, Treatment C appears to have reduced the desired behavior and is therefore acting as a punisher rather than a reinforcer. Luckily the behavior returned to baseline once Treatment C was discontinued. The results therefore show that the best treatment in terms of change is Treatment A but the best treatment in terms of longer standing impact is Treatment B. Treatment C is the worst treatment as it had the opposite effect than intended.
Figure 4.3: Determination of Best Training Method

